
Dental Plaster Traps: How They Work & When to Replace Them
Posted by Practicon, Inc on 14th Oct 2026
Dental Plaster Traps: How They Work & When to Replace Them
When we rinse instruments, mixing bowls or equipment used with dental plaster, the resulting wastewater can carry sediment into the sink drain. A dental plaster trap collects settling debris before it reaches downstream plumbing, helping reduce buildup and blockages. For practices and dental laboratories that routinely work with plaster models, inspecting and servicing the trap should be part of regular equipment maintenance.
How Dental Plaster Traps Work
A dental plaster trap connects to the sink’s drainage system. Its collection chamber slows the flow of wastewater, allowing heavier plaster particles to settle at the bottom while water continues toward the drain. This keeps settling material in an accessible container rather than allowing it to collect farther along the plumbing.
As the trap collects sediment, the container needs to be serviced. The procedure depends on the system: some traps use reusable collection vessels, while others have replaceable bottles or disposable containers. Knowing which type is installed, and keeping its instructions available, helps the dental team maintain it correctly.
Practicon offers compact Gleco Trap® bottle systems and larger high-volume systems. When reviewing options, consider the amount of sediment your practice generates, the available space beneath the sink and the product’s installation requirements.
Maintaining Your Dental Plaster Trap
The most useful maintenance habit is a consistent check of the sediment level. A trap may need attention sooner in a busy laboratory than in a practice that uses plaster only occasionally, so a calendar reminder should support, not replace, inspection of the collection container. Follow the manufacturer’s fill limit and any specified replacement interval.
Include the following in your maintenance routine:
- Check the collection container regularly. Practicon’s instructions for the Gleco Trap 64 oz. and 19 oz. systems call for weekly inspections and bottle replacement when residue reaches within 1 inch of the top. Other models may have different limits.th
- Keep the correct replacement container on hand. This allows the team to service the trap when needed without waiting for a refill to arrive.
- Wear appropriate personal protective equipment. Plaster trap maintenance involves contact with wastewater and accumulated debris, so protective equipment is important when handling the container.
- Check for leaks after servicing. For the Gleco bottle systems covered by Practicon’s instructions, run water for one minute after installing the replacement bottle and inspect the connections.
Whether the container should be cleaned or replaced depends on its design. Service a reusable vessel according to its manufacturer’s instructions, and replace a disposable container as directed rather than treating it as a reusable component.
When to Replace a Dental Plaster Trap
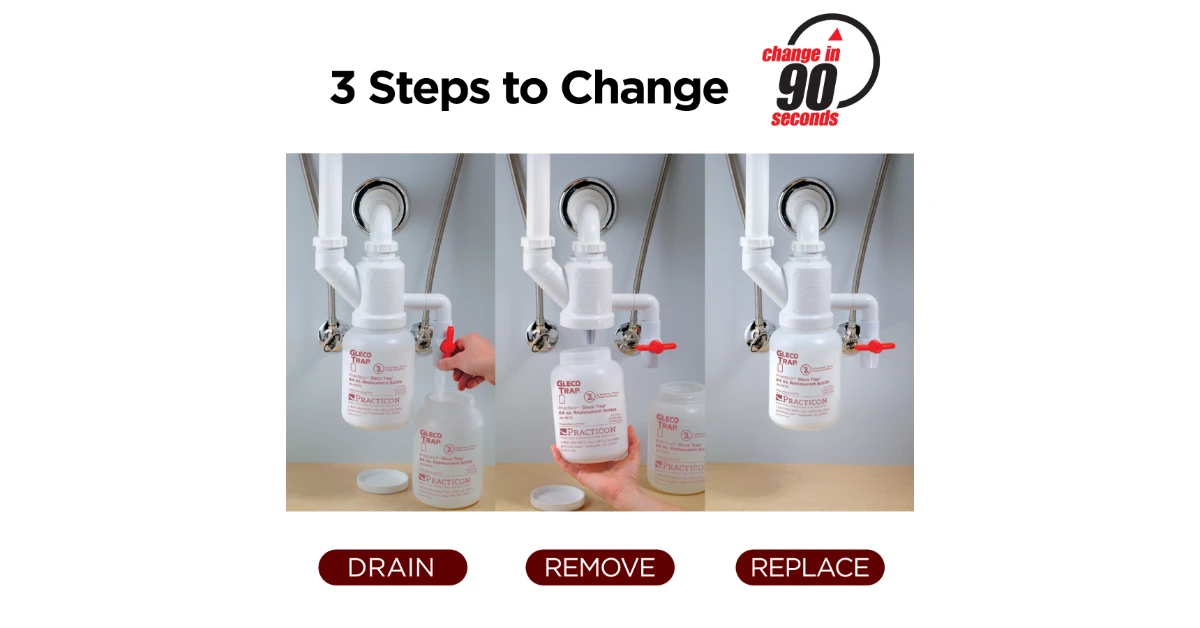
In many systems, routine replacement means changing the collection bottle or container, not replacing the entire installed assembly. Gleco Trap bottle systems are designed to allow the full bottle to be removed and a clean bottle attached without tools.
Use the manufacturer’s sediment limit as your primary guide. For Practicon’s Gleco Trap 64 oz. and 19 oz. systems, replace the bottle when residue reaches within 1 inch of the top. This threshold is specific to those systems and should not be applied to every plaster trap.
How to Replace the Collection Container
Before starting, identify the trap model and review its instructions. Bottle-style traps and high-volume bucket systems have different drainage and disconnection procedures.
Gleco Trap Bottle Systems
For the Gleco Trap 64 oz. and 19 oz. systems, Practicon provides the following changeout procedure:
- Drain excess water through the side drain into a new Gleco Trap bottle, then close the drain valve.
- Remove the full collection bottle.
- Seal the used bottle with its lid and dispose of it in accordance with applicable regulations.
- Apply a small amount of petroleum jelly to the top rim of the new bottle, as directed, and install it.
- Run water into the sink for one minute and inspect all connections for leaks.
The side drain allows excess water to be removed before the full bottle is disconnected, helping limit spills during maintenance.
High-Volume Plaster Traps
The Gleco Trap HV uses a different pre-drainage arrangement. Its lid reserves an air pocket inside the container. Removing the air-release plug before disconnection allows water in the inlet and outlet plumbing to drain into the bucket. Follow the HV system’s instructions for the remaining steps rather than using the bottle-system procedure.
Shop Dental Plaster Traps
A plaster trap should suit both your practice’s workload and the space available beneath the sink. Practicon carries compact Gleco Trap systems, high-volume options and replacement containers. Review the plumbing requirements, installation clearances and maintenance instructions to select a system your team can service consistently.